

We’ve put together a step-by-step guide to show you how to use stunning DIY text effects in your designs. You’ll never be stuck for ideas again, so get ready for 17 DIY text effects that you can start using right now!
Note: you don’t have to be a designer to use our text effects, but our graphic designers are seriously crushing on them!
Let’s get started so you can create your own DIY Text Effects in a snap!
17 DIY Text effects (you can learn to do now)
#1 SHINY, GOLDEN TEXT EFFECT

This is our all-time favorite of these DIY Text Effects. We never get sick of shiny, golden text! This type of text works for a whole range of purposes, such as posters, images… and of course shiny business cards!
To recreate this advanced text effect, do the following:
- Typeset each line of text in separate text boxes.
- Select the first text box, click the Edit Mask tool, and then in the panel on the right hand side, choose image search and search for “gold foil”.
- When you locate a suitable gold texture, click to add to your text.
- Adjust using the crop tools in the Edit Mask feature, and then repeat on the following words.
Note: Most text effects on this post are available for free in Easil (ie drop shadow and glow). Text effects using text mask, like gold foil lettering and other image-in-text effects are part of the Easil Plus plan. If it says “Edit Mask” in the instructions below, you’ll need to be on the Plus plan to access it.
#2 SOFT DROP SHADOW TEXT EFFECT

Creating a soft drop shadow is one of the simplest text effects you can add to your text to make it ‘pop’ from your design. Try it on your own design to add DIY text effects:
- Select your text, and then click on the Text Shadow Tool.
- Click on ‘Soft’ and then use the Color Picker to match a color that works in with your design for the shadow.
- Use the blur and distance sliders to move the shadow slightly away from behind your text.
The best part about this? Your text remains editable whilst keeping your drop shadow effect intact.
Hot Tip: Read our post about Drop Shadows and how to use them without messing it up!
#3 HARD DROP SHADOW TEXT EFFECT
When it comes to chunky fonts, striking, solid shadows look best! To create this solid, hard shadow effect, follow these steps:
- Create a hard drop shadow by selecting the text box you’d like to apply the effect to, and then click on the ‘Text Shadow’ tool in the top action bar.
- Click the ‘Hard’ tab and the “default black” hard drop shadow will be applied.
- To adjust the color of the shadow, use the Image Colors selector at the bottom of the pop-up. Select a color from the Document Colors that appear.
- Fine-tune your shadow with the distance and angle sliders.
Hot Tip: Don’t be too dramatic with your DIY text effects. Only use DIY text effects on type that you want to highlight. Not all type needs an effect.
#4 UNDERLINE TEXT EFFECT
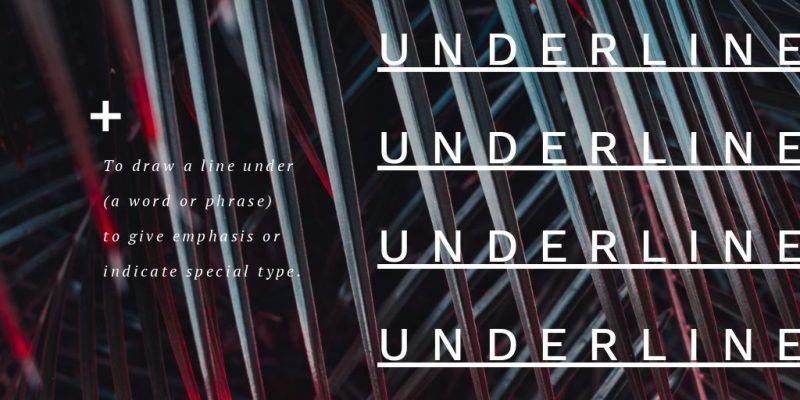
Underrated, but totally on trend, the underline text effect is another one-click effect you can use to create stand out text. It looks best when paired with a font of medium weight, such as Raleway, Work Sans Medium.
In Easil, applying an underline is easy.
- Click on any text to highlight the text in that particuliar textbox.
- Choose the Underline tool in the Action bar and the effect will apply to all text in the textbox you just highlighted.
- Be sure to separate out any text that you want to format in a different way, as the effect will apply to all text in the text box.
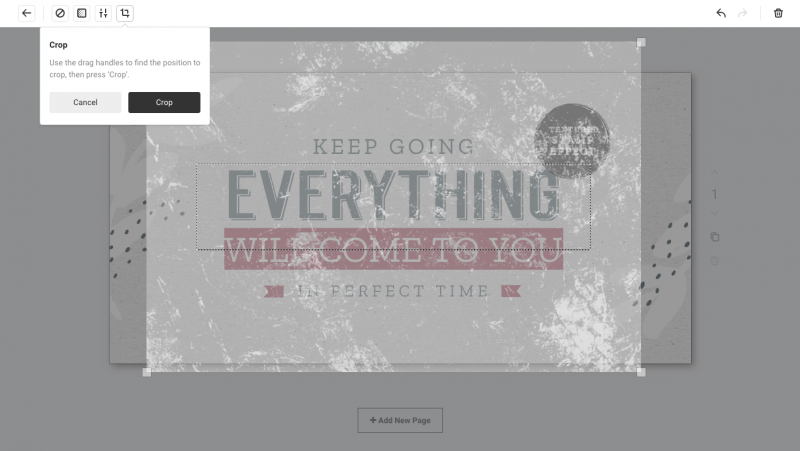
#5 ROUGH TEXTURED STAMP EFFECT
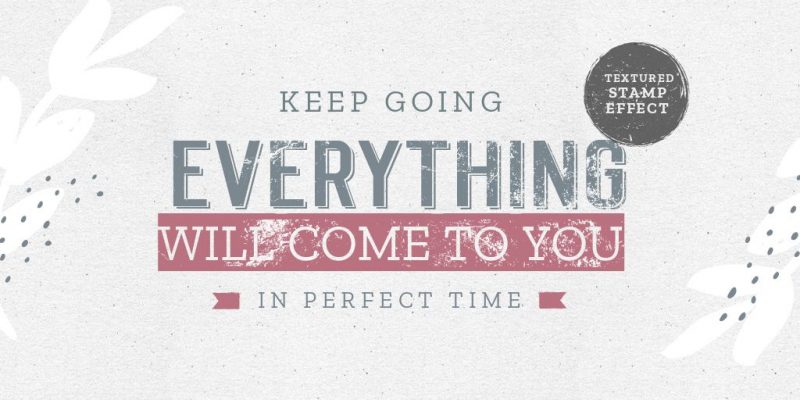
Rough text effects are on trend for everything from poster designs to fashion focussed email campaigns. You can achieve the same with DIY text effects in Easil, sans designer, sans Photoshop, by following these steps:
- Select the text box that you’d like to apply the rough texture to.
- Click on the Edit Mask button in the action bar.
- In the image tab on the right side bar, search for a background image with the search terms ‘Grunge texture”. When you find a suitable texture, just click to add it to your text.
- Adjust the scale and positioning of the texture by editing the mask further:
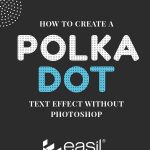
#6 POLKA DOT TEXT EFFECT
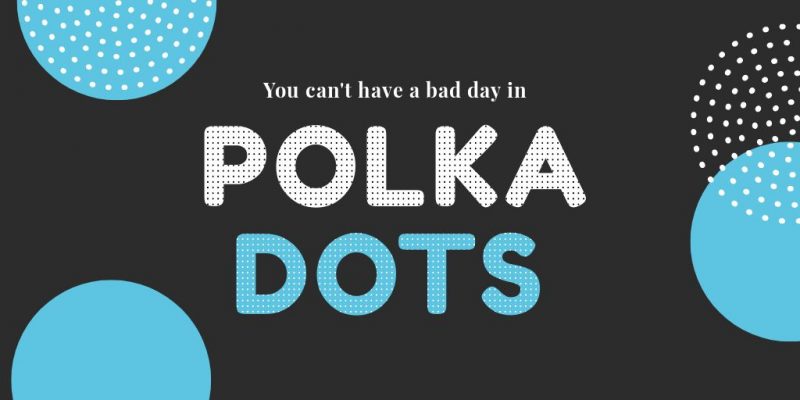
There’s something about polka dots that always makes us smile so we had to add it to this list of DIY text effects. They will lift your design in just a couple of clicks. And there’s a certain retro feel about them. To achieve this dotty effect:
- Typeset your text. In this design we created two separate text boxes so that we could have different colors and effects on each word.
- Select one of the text boxes, and click the Edit Mask button in the action bar.
- Search for ‘spots’ or ‘dots’ in the image search panel on the right side of the editor.
- Click on the dots patten and apply to your text.
- To change the color of the dots, edit the mask and hit the Filters tab, and ‘Inverse’ and you can quickly change a black pattern to white, or vice versa!
- Repeat on the following word, and apply a different font color.
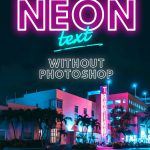
#7 glowing neon text effect

Think you need Photoshop to create cool glowing, or neon DIY text effects? Think again. Easil has you covered and you can master this effect in minutes:
- Select an outlined or lined font. We like Hussar Ekologiczny , Monoton, and the Neon Lights font. Change the font to white.
- Click on the Text Shadow tool, choose a bright neon color (we love the hot pink we used in the example below!), and then use the blur slider to increase the size of the blur.
- Duplicate your text layer, and position the copy directly above your original. This will increase the intensity of the glow. Experiment with adding a 3rd copy too for a multi-layered effect!
Hot Tip: By layering your text like the above, you’re setting up the perfect way to create a flashing neon light GIF!
Watch the video below to see the steps in action:
#8 STRIPED TEXT EFFECT

Step up the look of a standard font by inserting a high impact pattern, such as a diagonal stripe. It gives your text an element of motion without anything actually moving! Here’s how to create this effect:
- Add your text to the project (a bold text is best).
- Search for a “diagonal line” in the ‘Images’ tab and apply it to the text by selecting the ‘Edit Mask’ tool in the action bar at the top of the screen.
- Click the diagonal image to add it to the text.
#9 STRIPED SHADOW TEXT EFFECT

Vintage and Retro is one thing that never seems to go out of fashion with lettering. Achieve this effect by layering and offsetting two layers of text:
- Typeset your first layer of text, ensuring you’re happy with the font and spacing.
- Create a duplicate copy of the text. With this second layer, you’ll use the Mask Tool, and the Drop Shadow tool, to create the effects.
- Search for a ‘Diagonal’ lined pattern and apply it to the layer by selecting the ‘Edit Mask’ tool in the action bar at the top of the screen, and then click on the Diagonal image to add to the text.
- Using the same layer, apply a ‘Hard’ drop shadow to the text, and offset it from the masked layer using the ‘Distance’ slider.
- Position the top layer slightly offset to the masked and shadowed layer, and you’re done!
Watch the video below to see the steps in action:
#10 KNOCK OUT TEXT EFFECT
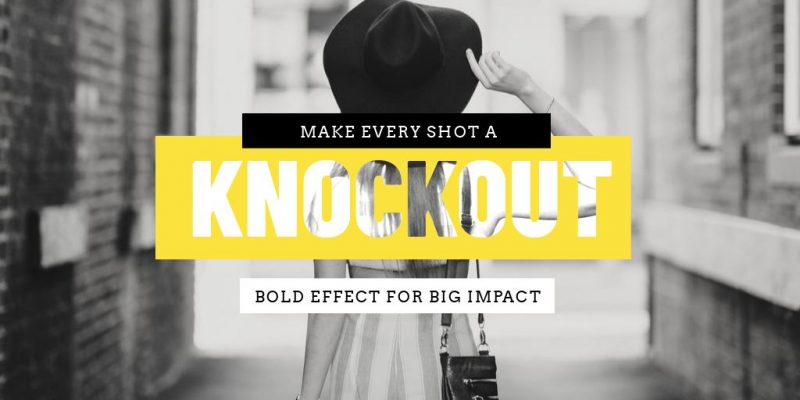
This text effect is a definite knockout. It’s just as the title sounds – text knocked out to reveal something fun like colors, a photograph or an eye-catching pattern. To achieve this effect:
- Set an image as the back layer of your design.
- Typeset your text, making sure to use a nice, chunky font for the word you’ll want to ‘knock out’.
- Select the text you want to apply the knock out to, and then the ‘Edit Mask’ button in the action bar.
- Click on the ‘Assets’ tab on the right side panel, and locate the same image you used to set the background. Click on that to apply to the text.
- To refine the image positioning, click on ‘Crop’ within the Edit Mask subtools and stretch out the image to match the image behind.
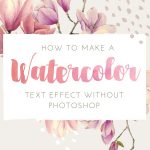
#11 WATERCOLOR TEXT EFFECT
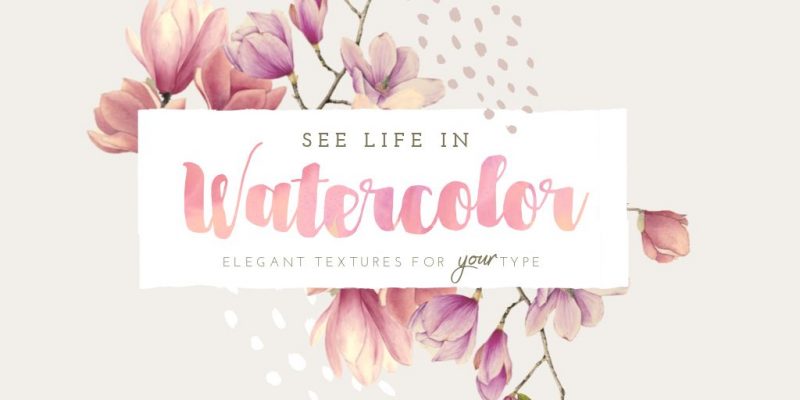
To create this gorgeous watercolor text effect, we once again used our Text Masking tool:
- Select the text you’d like to apply the texture to, simply by clicking on the text box.
- Click the ‘Edit Mask’ button in the top action bar.
- Search for a ‘watercolor’ photograph in the image search tab, or upload your own.
- Click on the image result you’d like to add to the text, and it will automatically fit to the size of your text.
- Adjust the image positioning by using the crop function within the Edit Mask tool, and by dragging the image to reposition.
Hot Tip: Search in Easil under ‘watercolor blue’ or ‘watercolor pink’ to get specific about the background watercolor effect you are looking for before creating your DIY text effects.
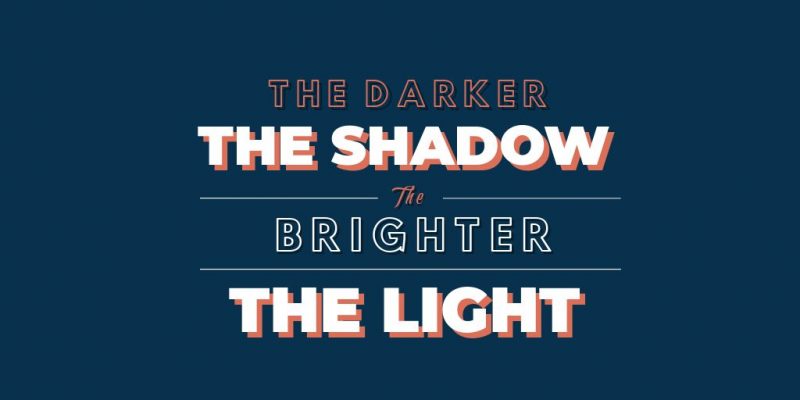
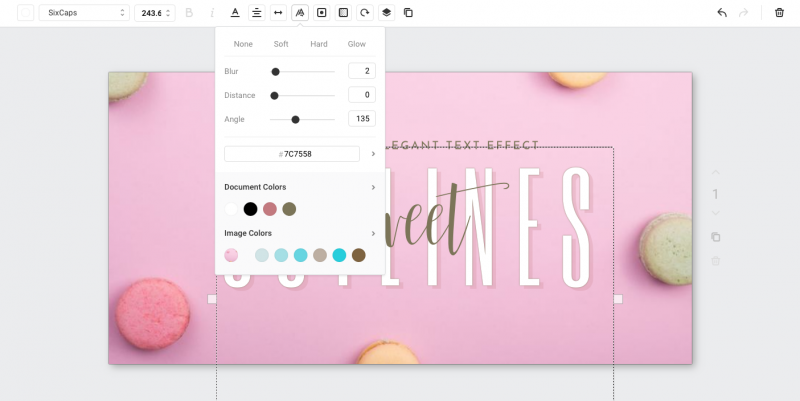
#12 THIN OUTLINE + DROP SHADOW TEXT EFFECT
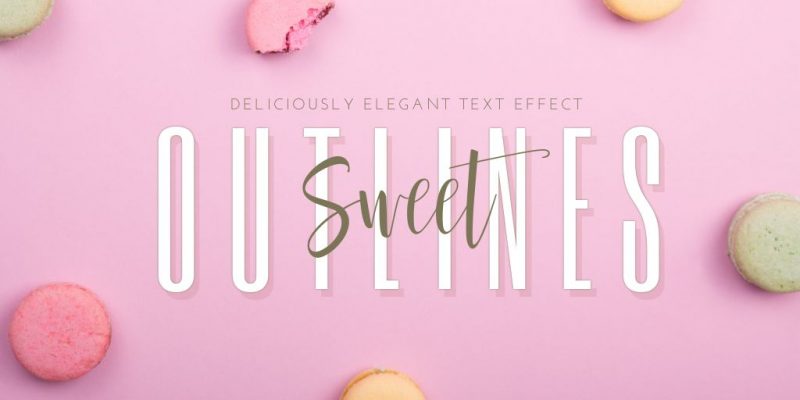
This is all about contrasts. Using a thin outline and a drop shadow effect, makes your text pop! Here’s how we achieved this effect:
- Chose our typeset text and hit the ‘Text Shadow’ Tool in the actionbar.
- Manually moved the adjustment sliders to a Blur of only 2, and the distance to zero.
- Applied a color to the outline from the Image Colors presented by Easil.
- To create the secondary shadow, we duplicated the text layer, moved it behind the top layer and slightly offset it.
- We cleared the text effects from that layer, and just applied another color to create a light shadow.
#13 FLOATING TEXT EFFECT

Create the impression of floating text by using a soft blur effect on your heading:
- Select your text box, and click the Text Shadow tool in the action bar.
- Click the ‘Soft’ tab, and then use the Blur slider to extend the shadow out further. In our example we used a blur setting of 42, and distance of 16.
- To match the text color to the background, we used Easil’s color picker tool.
Watch the video below to see the steps in action:
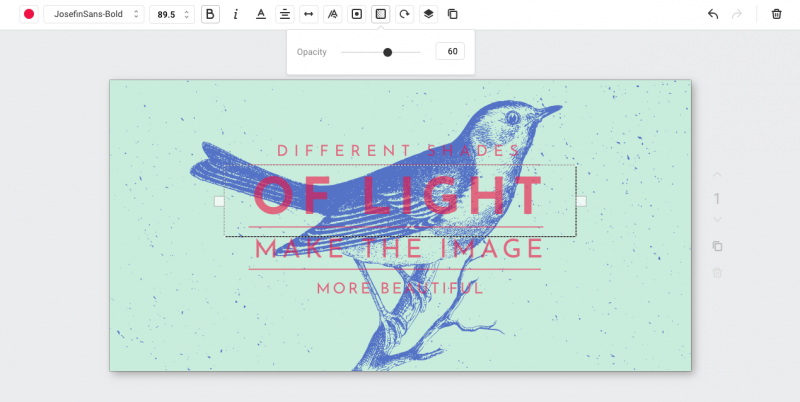
#14 TRANSPARENT TEXT EFFECT
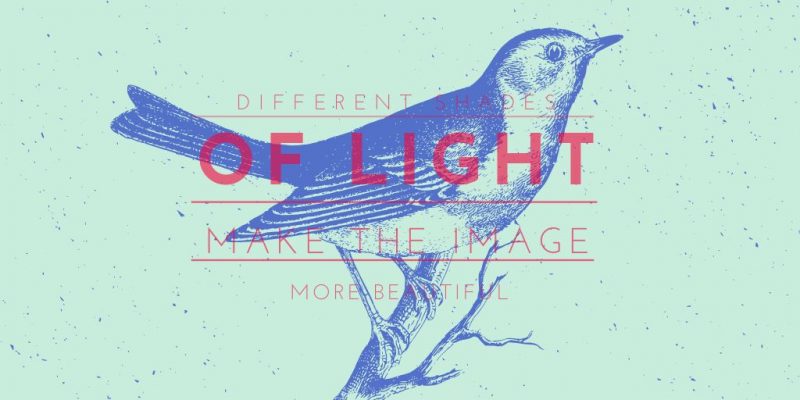
Adjust the transparency of text placed about a photograph or graphic element by using the Opacity slider, letting the image behind show slightly through the text.
Here’s an image to show you how:
#15 simple extruded text effect

Once you’ve mastered the Hard Drop shadow, play with adjusting it’s distance from the main text by pushing the distance further. Ensure that you keep the angle at 135. That’s it!
#16 SOFT GLOW TEXT EFFECT

This is one of our favourite text effects – the soft glow effect. Here’s how we create this calming but cool effect:
- Select the text, and click on the Text Shadow button in the action bar.
- Select the ‘Glow’ tab from the effects to apply the default glow setting.
- Refine the glow by playing with the Blur slider.
#17 GRADIENT TEXT EFFECT

Create soft effects for headings or large text by inserting a gradient image into the font of your choice. Here’s how we achieved this look with DIY Text Effects:
- Select the word ‘Daydream’, and click on the ‘Edit Mask’ button in the actionbar.
- Go to the search in the images panel, and look for ‘gradient’.
- Click on the image that suits your design to apply it to the text.
OVER TO YOU
If you loved these stunning DIY Text Effects then it’s time for you to have some fun and create your own in Easil. Have you tried them?