Have you experienced design-envy when you see the brands you admire [and competitors] adding awesome animated GIFs and stickers to their Instagram Stories and Reels?
If you’ve wondered how they do it, and how to start the process for your own brand, we’re here to show you exactly how to do it, step by step. And with our hacks, you can start using them immediately – no GIPHY account required!
These are the skills that we’ll detail for creating frame-by-frame animation, with our GIF maker:
- Creating animated GIFs in Easil, and sharing them with your teammates for posting on stories and Reels.
- How to create GIFs and stickers, and load them into a public GIPHY search – so the whole globe can search and add your stickers to their own stories and Instagram Reels.
- Creating GIFs and adding them to Tenor.
WHY YOU SHOULD CREATE BRANDED GIFS FOR INSTAGRAM STORIES [AND REELS!]
There are a bunch of benefits for creating GIFs of your own. From increasing brand awareness, through to having more creative assets on hand to customise your stories as you post. They’re fun, inject personality into your brand, add movement to your story without tricky or time consuming video editing, and did we mention… super fun and a little bit addictive?!
Animated GIFs can be added to Instagram Stories in a couple of different formats; generally known as Animated GIFs or Animated GIF Stickers.
Animated GIFs:
These are the GIFs that have a flat, opaque background, and look like these examples where the edges are square, and each pixel contains a color.


Animated GIF Stickers:
Stickers on the other hand, contain transparent pixel areas. This means that when you add them on top of any content in your Instagram Stories or Reels, the text or graphic elements that you create will appear without the boxy effect around them, just like the ones you add from the Giphy sticker integration within Instagram!
[Scroll down to learn how we created each of these effects!]

How to make an animated GIF Sticker in Easil
Creating a GIF is a frame by frame animation adjustment style in Easil. You have full control over what colors you want to change, updating text and so on, just as you would in any standard design.
Creating your GIF Design
If you’re new to designing, we always recommend starting with a design template.
- Open the template in Easil.
- If there is a background on the design, keep in mind that the design will be that square or rectangular shape. Change the background color to transparent (and remove any images in the background) if you are wanting to create a GIF Sticker.
- Make your adjustments to the design, creating the ‘final’ result you want.
- Duplicate the page to create your additional pages, that become each frame of your animation.
- Make slight adjustments to the design elements on the additional pages/slides to create movement. This could also simply include adjusting the color of text so that it flashes between colors, or clicking on elements and enlarging or reducing them so that they ‘pop’ in and out of the design. See the techniques below for more detail on how to achieve movement.
- Once your design pages are complete, select Download from the top right of the screen, and ‘GIF’. If your design does not contain a background, it will download as a GIF sticker. If there is a background present, that will be contained in the GIF file. Choose your download speed, and your file will be ready shortly!
Try these quick & easy animation styles to give your GIFs some movement
You only need a little bit of movement or variation of color between your pages (or frames) to make a super-cool GIF. Try out some of these techniques on your graphic or text elements, to create GIPHY-worthy GIFs!
Stacking text effect

How to create this effect:
- Design your complete layout, with all of the text typeset. Always design with the end in mind! Click here to start with our template.
- Set the background color of the design to Transparent.
- Work out how many frames you would like your GIF to be. In this case we wanted one line of text to appear on each frame.
- We duplicated the complete design page for a total of 4 pages.
- Remove the information not required on each page, ensuring you keep the required content in the order you would like it to display. (See below)
- Click on the Download button, select GIF, and then choose a download speed. Your GIF sticker is ready to use!


Moving Element + Text Change effect

This simple 2 frame animation can be completed in less than a minute!
- After you’ve completed your design layout, simply duplicate the page. Remember to choose transparent background if you’re wanting to create a sticker GIF.
- On the second page, adjust the position of a graphic element, to provide some movement. In our example we just rotated the thumb slightly. We also updated the font on the banner section to one that is quite different to the original font, to provide some visual contrast.
- That’s it – ready to download. We chose ‘Fast’ as the speed option for this sticker.


POPPING STICKER EFFECT

This is another type of animation that works well with just 2 frames to start off with!
- Create your completed design layout, and keep the background transparent.
- Duplicate the design page once.
- On the second page, select all elements on your design (drag your mouse over all items, or Command/Control+A) and increase the size by dragging them out a bit.
- Duplicate the page again if you choose to, and add extra design elements that will appear on this page.
- Click on Download at the top right of the editor, select GIF, and choose your GIF playback speed.


ROTATING TEXT EFFECT STICKER
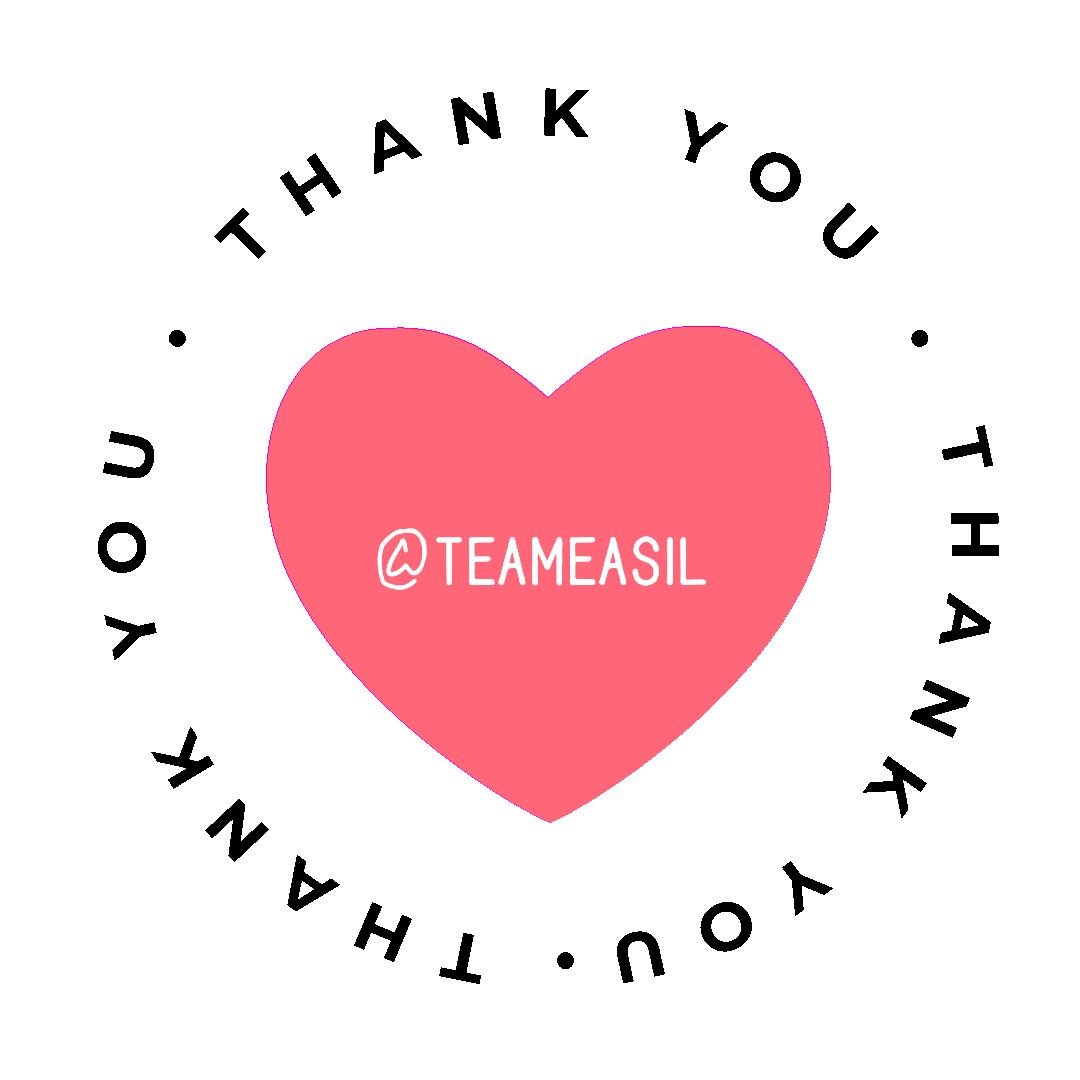
Rotation can be applied to any graphic element in your sticker to create a striking effect. In ours, we opted to use circular text. Just because, who doesn’t love curved text?!
Our design example combines a couple of techniques – the rotation of the text, and we also added a color change to the graphic element on every second frame, to create a flashing effect. Avoid adding any more effects than this to prevent eye-soreness..
- Create your completed design, including the curved text, main graphic element and center text. Set the background to transparent if you’re creating a sticker element.
- Duplicate your page 5 times, for a total of 6 pages (or frames) in your GIF.
- Update the color of the heart on every second frame.
- From page 2 onwards, the text will be rotated. Click on the text, and then the Rotate tool in the top Actionbar. We added 24degrees of rotation for each subsequent frame (2nd frame = 24, 3rd frame = 48, etc).
- Click on the download button, choose GIF, and your chosen playback speed, and you’re ready to use your Sticker!


If you’re looking for more creative ideas and inspiration for creating GIFs, check out our previous articles:
- 7 Ways to Make GIFs for Non-Designers
- Branded GIFs: How to Make GIFs that make your Brand stand out
- How to make an Animated GIF with Easil that will turn heads
- 7 Ways to create awesome Animated GIFs in under 5 minutes
Using your GIFs in Stories, without a GIPHY Account [iPhone required!]
- Create your animated GIF and save to your Camera Roll.
- Go into Instagram Stories, and create a Story.
- With the Story still open, click back into your camera roll, locate the GIF and ‘Copy Image’ (on iPhones).
- Immediately go back to your Story in Instagram, and you’ll get a little pop-up in the lower left corner to add your sticker. Click on this and your static or animated GIF will be added to your story!
For Android users, there are some additional steps required, and can be hit and miss with working as an animation in stories unfortunately.
- Download the Swiftkey Keyboard App.
- Start creating your Instagram Story, selecting a video or image background.
- Click on the Text (Aa) icon at the top right of the Instagram UI.
- On your Swiftkey keyboard, click on the smiley face icon at the bottom left and the the Pin icon on the right side.
- Click on the Create button to select your sticker from the folder it’s saved to, and then the send icon.
With this method you can share your files with your clients, team-mates and who-ever else you need to, providing them with a quick and easy option to brand stories.
How to apply for a GIPHY account for your GIFs
Creating a Brand or Artist account on Giphy requires that you go through an Approval process. After you create an account, you’ll find an option to ‘Join as an Artist or Brand’ at the bottom of the page. Complete the details, ensuring you use a top-level-domain email address, and then (if you haven’t already), get to work with filling your account with some stand-out creative stickers and GIFs!
When creating for GIPHY, your designs will need to be a bit more generic than they would be just for your brand. GIPHY is searching for content that many people want to use, so you’ll need to do your best to avoid using brand logos and promotional content as much as possible.
This is another great reason to create your library of GIFs on your own phone – it’s 100% in your control!
The GIFs in your account will not be searchable in Instagram Stories/Reels and other Giphy partners until your account is approved. We’ve heard the process ranges from a couple of days, to several weeks. If you don’t hear from them within that timeframe, send a follow up request to support, but do ensure that your account has quality, sharable content included before you do this!
How to add your GIFs to Tenor
Tenor is the GIF library owned by Google and is the largest GIF platform on the internet, and allows you to share your GIFs directly from the Tenor GIF Keyboard. Use them on LinkedIn Messaging, Facebook comments, on your website, and more.
It’s easy to setup an account by selecting a user name plus valid email address, and agreeing to the Terms of Service and Privacy Policy.
From there, all you need to do is click on the Upload button at the top right of the screen, and then drag and drop your GIF file in, add tags for search, and then finalise upload. Your GIF will be available to share on various social networks with the buttons displayed, as well as via Share URL and Embed code.
OVER TO YOU
Are you ready to start building a GIF library for your brand, or for your clients? We’d love to see what you create! Tag us @teameasil in Stories, Reels or posts when you’ve used these tips!