Looking for some easy ways to make GIFs? In this post, you’ll learn 7 ways to create pro-quality GIFs in just minutes, even if you’re a non-designer.
GIFs are a fun, quick way to add personality to your messaging and visual content. They capture our attention, make us laugh and engage us in a way that is very different from static images or videos.
And the best part is that we can use GIFs in many places: from emails to messenger apps, blog posts, direct messages, comments and replies, stories, social media posts and more. In fact, GIFs have become so popular that they have become a well-loved feature of just about every social platform. As such, most of your favorite social networks now include ways to post and share GIFs, often integrating with Giphy, the largest online GIF library.
So, now that we’ve established that GIFs are awesome, let’s look at how GIFs are made in Easil:
HOW DO GIFS WORK IN EASIL?
Creating GIFs in Easil gives you a ton of flexibility. Of course, you can animate text, but why stop at text alone? With Easil’s GIF Maker, you can also change colors, filters, images, shapes, icons and the wording on each slide to create animated GIFs with a difference!
We like to think that Easil gives you a lot more creative freedom than most DIY tools when it comes to creating GIFs. And we also like to keep you inspired by posting tips for creating different types of GIFs on this blog (and templates). If you need more tips for creating GIFs in Easil, you can find them in this post and in this post.
Creating GIFs in Easil
Think of the process as building up a visual ‘flip-book’ of designs. Each screen or page in your design contains a variation to the artwork, which creates movement on the design as it ‘flips’ through in playback.
Creating GIFs in Easil is like creating a visual ‘flip-book’ of designs.
All you need to do is make one or more changes to each screen or page. Those changes, built up over time (and published in the finished GIF) bring your design to life in the form of simple but powerful animation.
Hot Tip: Keep it simple with just 2-3 pages or screens. Once you get the hang of this GIF-creation business, try extending it out to 8-10 pages for a more extensive GIF animation.
As with all things Easil, it’s easier to show you rather than tell you. Let’s take a look at some GIF-creation in action, so you can create your own GIFs in no time at all using Easil’s GIF Maker.
Easil’s GIF feature is available on Plus & Edge plans, including the 30-day Plus Free Trial!
7 Easy GIF Design Tricks that Non-Designers can use
Are you ready to get started? You’re going to love these templates that our design crew has prepped for you. Here are just a few ways that you can create GIFs to take your designs to the next level:
1. CREATE GIFS WITH A SHRINKING DESIGN ELEMENT
In this first example, we’ve created a cool GIF effect that will instantly catch the attention of users and followers. It works really well with any image placed inside a graphic shape. And of course, you can use text too!

To create this GIF design, check out the following steps. Make sure you refer to the images below to see a visual overview of how each text slide should be edited.
- We started with a “Social Media” size template from Easil’s library to get started.
- We dropped a photo into a Shape Mask. To do this, go to the Graphics tab on the right SideBar menu. Click on the Shape Masks category, and locate a shape that you’d like to use (or try a circle, as we used!).
- Added a Shape Mask to the design, go to the Images tab on the right sidebar, and drag across one of your images. You’ll notice that the image snaps into place when it is hovering directly over your shape.
- Duplicated the page, and then on the second page, reduced the size of the circle or shape so it would be smaller than the first page.
- Repeated these steps until the final image was substantially smaller than the original.
- Chose Download to publish the GIF and chose Medium as the speed.
Like our design? Click here to use our ready-to-go template!


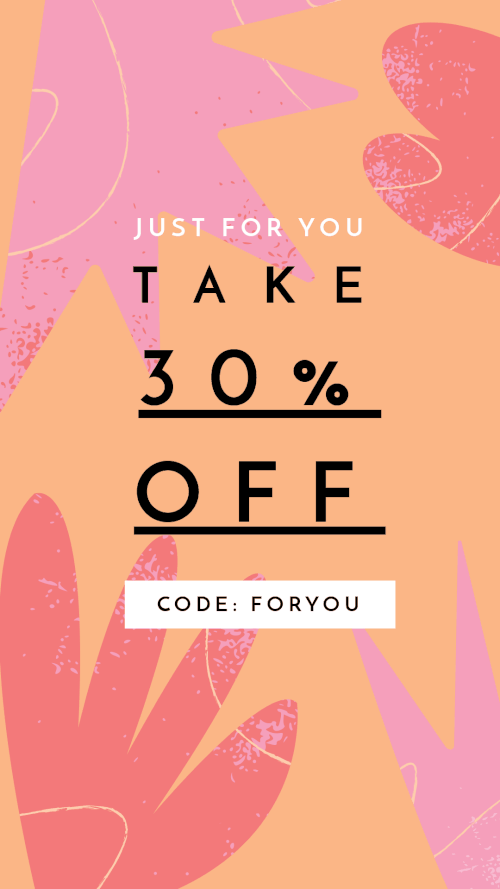
2. MAKE GIFS USING STACKING TEXT
In this next example, we’ve created a GIF that brings in the text, line by line. Then we make it disappear again. This style is HOT right now, but is so easy to create!
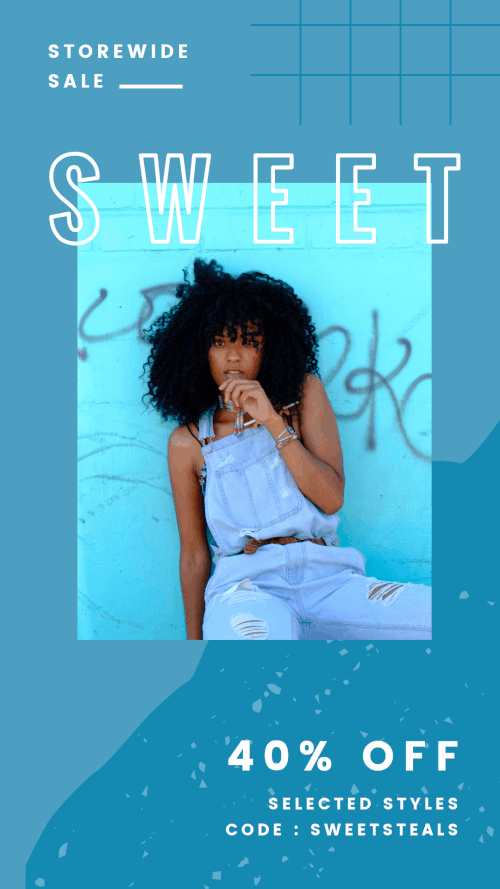
To create this GIF design, we used the following tricks. Make sure you refer to the images below to see a visual overview of how each text slide should be edited.
- We created our design including a background image and text overlay. We typeset the ‘Sweet Sweet Sweet Steals’ section first, making sure to add each line of text into a separate text box.
- Duplicated the image using Copy to create a total of 4 identical pages.
- On pages 1-3, we removed sections of the text so that each line builds on to a new page.
- We then duplicated page 3 another time, and edited the words ‘Sweet’ to ‘Steals’, as per the final page example.
- Again we duplicated this page 3 times, giving us a total of 8 pages.
- For pages 5-7 we removed the words in the opposite way, building them up.
- Clicked Download to publish the GIF and chose Slow speed.
- Saved and shared!
Like our design? Click here to use our ready-to-go template!


Hot Tip: When working with animated text, it’s always best to add each line or section of text into its own Text Box. This makes it easier to remove elements with one click in order to create the stepped GIF animation.
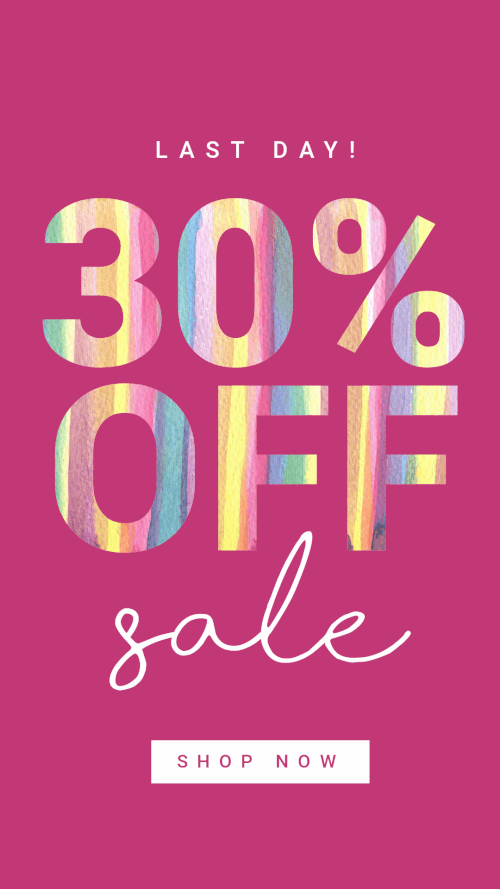
3. BUILD GIFS USING GLOW EFFECT
It’s time to light up your graphics with a bright, flashing glow on your text and background! This neon ‘glow’ GIF is perfect for Black Friday Sales or any time you want to catch attention:
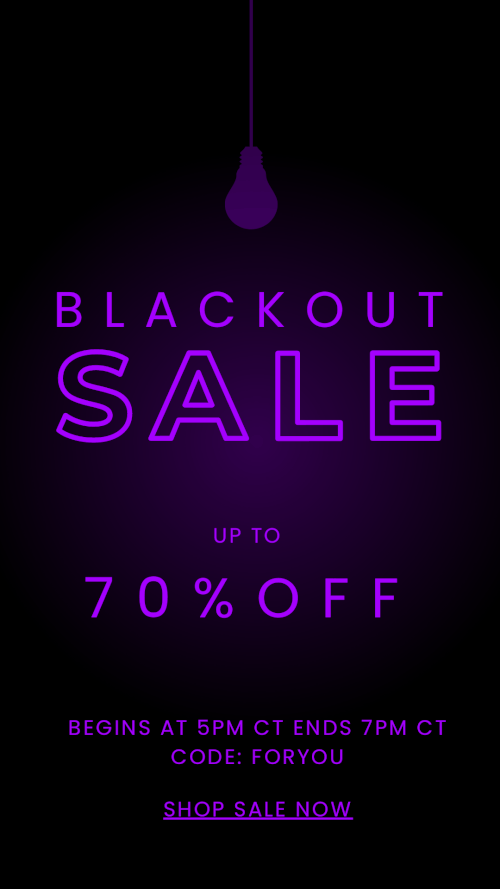
To create this glowing neon-GIF design, we used the following tricks. Make sure you refer to the images below to see a visual overview of how each text slide should be edited.
- Typeset our design, with each letter in the word SALE created in its own text box.
- Duplicated the design 6 times, for a total of 7 pages.
- Changed the color of the letters in SALE to white, increasing one extra letter per page.
- Changed the background color of the 6th page to be purple (from black).
- Changed the color of all elements on the 7th page to a dark grey against a black background so that the text and light bulb icons are barely visible. This creates a blackout effect.
- Duplicated page 6, and moved it to page position 8 to finish off the blinking blackout effect.
- Clicked Download to publish the GIF and chose Fast speed.
- Saved and shared!
Like our design? Click here to use our ready-to-go template!


Hot Tip: To use your GIF on Instagram Stories, you’ll need to convert it to video first. Use a free tool like EzGif.com to transform your GIF into video in seconds.
4. MAKE GIFS WITH MULTIPLE PEOPLE OR PRODUCT SHOTS
In this next example, we’ve used the popular cut-out or ‘sticker’ images that you’re seeing everywhere from YouTube thumbnails to websites. This is a perfect style to create a ‘Meet the Crew’ GIF.

To create the individual images, we used Easil’s exciting new Background Remove Feature. It’s perfect for creating GIFs that include people or product shots. Here is how we did it in two overall steps:
1. Creating Cut-Out People or Product Images
Firstly, you need to create the images you will use in the GIF. In this case, we needed to remove the backgrounds and replace them with a fun gradient image from the Easil library:

To create individual cut-out images like the ones you see above, follow these steps:
- Go to the My Images tab on your Workspace. Click Upload to upload your images.
- Scroll to locate the newly uploaded images. Click on the drop-down arrow to the right of any image you want to edit. Choose Remove Background.
- A pop-up box will appear. Confirm Remove Background. Note that Credits are required to use the Remove Background tool, and are included on paid Easil plans. Receive 5 credits each month on Plus plans, and 50 credits each month on Edge plans.
- To use your new images on a design in Easil, open a new design or template in the Editor, navigate to the Images tab in the SideBar and click or drag to add the image to your design. You can also add your images to folders to find them again easily.
Now let’s take those images and add them into our GIF!
2. Create the GIF from the Series of Images
To create this GIF design, we used our transparent images and the following steps. Make sure you refer to the images below to see a visual overview of how each text slide should be edited.
- We started with a blank, square “Social Media” size template from Easil’s library to get started.
- We added one of our new ‘Crew’ images from the Images tab on the SideBar.
- Adjusted the placement of the image on the background to suit the border and space.
- Opened the Images tab to choose a pink gradient background image. Find it here.
- Moved the image to the back layer of the design, using the Position tab.
- Duplicated the image a total of 3 times for a total of 4 pages.
- Changed the ‘crew’ member image on pages 2, 3 and 4 by deleting the existing image and adding the new image from the Images tab as an overlay.
- Adjusted the image of the crew member as necessary on each page, to suit the design.
- Clicked Download to publish the GIF and chose Slow Speed.
- Saved and shared!
Hot Tip: You can get really creative with Easil’s Remove Background Tool. It’s a game-changer for designing like a pro in Easil. Find out more about how to use it here and full step-by-step instructions.
5. CREATE GIFS WITH MOVEMENT INSIDE TEXT
Sometimes, less is more. In this example, we’ve already got some stand-out text, so all we needed to do was add a little movement. The following style can be used to make your text dance on the page:
To create this movement-in-text effect, we made the following simple change to the design. Make sure you refer to the images below to see a visual overview of how each text slide should be edited.
- We used a ready-made template with bold text including a background pattern added with the Image-in-Text tool in Easil.
- Duplicated the image for a total of 2 pages.
- Adjusted the position of the image within the text mask by clicking on the Text Mask icon, and then the crop button.
- Changed the color of the Call to Action button on the second page from white to Yellow (by clicking on the button and changing the color in the Color Palette tool in the Action Bar)
- Clicked Download to publish the GIF and chose Slow Speed.
- Saved and shared!


Like our design? Click here to use our ready-to-go template!
Hot Tip: You don’t need to always make a lot of changes or add a lot of pages for your GIF to catch attention. In fact, some of the most powerful and eye-catching GIFs consist of just 2-page designs!
6. MAKE GIFS WITH MOVING GRAPHIC ELEMENTS
The beauty of using Easil’s GIF Maker is that you can animate any element. You’re not restricted to animating the text. In this example, the graphic elements do the dancing:
To create this effect, we used the following tricks. Make sure you refer to the images below to see a visual overview of how each text slide should be edited.
- Used a ready-made ‘discount template’ from our Instagram Stories templates.
- Duplicated the image 2 times for a total of 3 pages.
- On Pages 2 and 3, moved and rotated the 4 x graphic elements to slightly different positions as shown below.
- Clicked Download to publish the GIF and chose Medium Speed.
- Saved and shared!
Like our design? Click here to use our ready-to-go template!


Hot Tip: Get creative with shapes and graphic elements when creating GIFs. They can rotated using the Rotate button in the ActionBar, expanded or retracted in size, or made to appear and disappear. Try different ways of manipulating them to create your GIF.
7. CREATE CROSS-PLATFORM GIFS
Think in terms of efficiency (as well as creativity) when you create your GIFs. In the next example, we’ve created a GIF that will catch attention in your email campaigns, as well as on your Pinterest feed with a tall image. This GIF is optimized for both!

To create this effect, we made the following simple changes to the design. Make sure you refer to the images below to see a visual overview of how each text slide should be edited.
- Used a Pinterest-Mid template as our base design and modified the text to reflect our brand message.
- Duplicated the image for a total of 2 designs.
- Switched out two of the collage images by choosing new brand/product images from the Images tab.
- Used the Color Palette tool in the ActionBar to change the color of the bold and script fonts (from white to yellow and vice versa).
- Clicked Download to publish the GIF and chose Medium Speed.
- Saved and shared!


Like our design? Click here to use our ready-to-go template!
BONUS GIF TIP:
You may be aware that Instagram has added a new swag of features to Instagram Stories called “Create Mode”. This allows you to share posts without adding your own photos or videos and gives you a lot of creative choice to add elements like GIFs, stickers or basic templates that help you tell your story.
One of these new features is the ability to add a GIF background. Simply open up Instagram Stories Camera Screen choose “Create” on the bottom menu and then choose GIF from the list of menu items.
You’ll be given asked to “Add GIF to your Story” and prompted to Search Giphy.
Select the GIF you wish to add and it will be added to the screen (in triplicate).
Now all you have to do is add any extra information like text or additional GIFs, Stickers or images, and post it to your Story! If you have a Giphy branded channel your GIFs are searchable. Or use GIFs created by others in your stories.
Hot Tip: Try searching under the hashtag #Teameasil to find some of our fun GIFs to add to your stories.
Your Turn
Tell us, what animated GIF Tricks did you like the most out of this article? Do you have any questions about how we created some of these GIFs?
Ask us in the comments below and one of our designers will be happy to answer!